Views: 222 Author: Tomorrow Publish Time: 2025-01-08 Origin: Site


Content Menu
>> 4. Attach the Liner to the Basket
● Additional Techniques for Customization
● Creating Patterns for Unique Shapes
● No-Sew Method Explained in Detail
● Sewing Method Explained in Detail
● FAQ
>> 1. Can I use any type of fabric for lining my wicker basket?
>> 2. How do I ensure my fabric stays in place?
>> 3. What if my basket has handles?
>> 4. How can I wash my lined basket?
>> 5. Can I change my liner later?
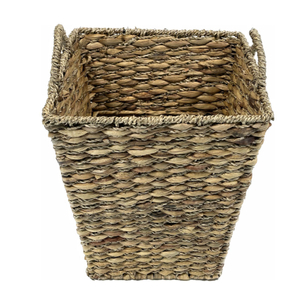
Covering a wicker basket with fabric can transform it into a stylish and functional piece of decor. Whether you're looking to refresh an old basket or customize a new one, this guide will provide you with detailed steps on how to cover a wicker basket with fabric, both with and without sewing.
Before you start, gather the following materials:
- Fabric of your choice (about 1 yard or more depending on the basket size)
- Measuring tape
- Scissors
- Fabric adhesive or hot glue gun
- Pencil or fabric chalk
- Newspaper (for creating patterns)
- Straight pins (if sewing)
- Sewing machine (if sewing)
Start by measuring the dimensions of your wicker basket:
- Base Measurement: Place the basket on a sheet of newspaper and trace around its base. This will help you create a pattern for the bottom of the liner.
- Height Measurement: Measure from the base to the top edge of the basket, adding an extra 5 inches for seam allowance.
- Circumference Measurement: Measure around the top edge of the basket and add 1 inch for ease.
Using your measurements, cut the fabric as follows:
- Bottom Piece: Use the traced outline from the newspaper as a template to cut out a circular piece of fabric for the base.
- Side Piece: Cut a rectangle using your height and circumference measurements. This piece will wrap around the sides of the basket.
If you're using a no-sew method:
- Fold over the edges of both pieces to create a clean finish. Use fabric adhesive or a hot glue gun to secure these edges down.
If you're sewing:
- Pin the side piece to the bottom piece, aligning them properly. Sew around the edges using a straight stitch, leaving about 1/4 inch seam allowance.
For both methods, once you have your liner prepared:
- Place it inside the basket, ensuring it fits snugly.
- If you used elastic, measure and cut a piece that matches the circumference of your basket's top edge. Pin it to the wrong side of your liner about 1 inch from the top edge, then sew it in place while stretching it slightly to ensure a snug fit.
After attaching your liner:
- Fold over any excess fabric at the top edge and secure it with glue or by sewing.
- For baskets with handles, you may need to create slits in your liner where handles are located, ensuring they fit through comfortably.
To enhance understanding, refer to these images and videos that illustrate each step:
The choice of fabric can greatly influence both aesthetics and functionality. Consider using:
- Cotton: Ideal for casual baskets; easy to wash.
- Linen: Offers an elegant look; breathable but may wrinkle easily.
- Canvas: Durable and sturdy; great for heavy-duty use.
To make your wicker basket truly unique, consider adding embellishments such as:
- Ribbons or bows tied around handles
- Decorative buttons sewn onto fabric
- Stencils or fabric paint designs
These details can elevate your project from simple to stunning.

If you're working with uniquely shaped baskets, creating patterns is essential:
1. Trace Around Your Basket: Use paper or newspaper to trace around each side of your basket.
2. Add Seam Allowance: When cutting out your pattern pieces, add an extra 1/2 inch for seam allowance.
3. Cut Out Your Fabric: Using your patterns, cut out pieces from your chosen fabric.
4. Assemble Your Liner: Follow previous steps but adjust as necessary based on your unique shapes.
For those who prefer not to sew, here's how you can achieve beautiful results using just glue:
1. Choose Your Fabric Size: Cut a large rectangle that can cover all sides of your basket comfortably.
2. Wrap Fabric Around Basket: Center your fabric over the basket and fold it over each side.
3. Secure with Glue: Use hot glue along edges where fabric overlaps or meets itself inside the basket.
4. Trim Excess Fabric: If needed, trim any excess fabric at corners for a cleaner look.
5. Finish Edges Neatly: Fold raw edges under before gluing them down for a polished finish.
If you opt for sewing, here's how you can create a professional-looking liner:
1. Cut Fabric Panels: Cut individual panels for each side of your basket based on measurements taken earlier.
2. Sew Panels Together: With right sides facing each other, sew panels together at edges using straight stitches.
3. Attach Bottom Panel: Once side panels are sewn together into a ring shape, attach a bottom panel by pinning it in place and sewing around its perimeter.
4. Create Top Hem: Fold down the top edge of your liner about 1/2 inch and sew in place to prevent fraying.
5. Insert Liner into Basket: Finally, turn your liner right-side out and place it inside your wicker basket.
Covering a wicker basket with fabric is an enjoyable DIY project that not only enhances its aesthetic appeal but also adds functionality. Whether you choose to sew or use adhesive methods, personalizing your baskets can help organize your space while reflecting your style.
With various customization options available—from choosing different fabrics to adding personal touches—you can create beautiful baskets that serve practical purposes in any room of your home.

Yes, you can use various types of fabric such as cotton, linen, or even synthetic materials depending on your desired look and durability requirements.
Using fabric adhesive or hot glue ensures that your fabric stays securely attached to the wicker basket. If sewing, make sure to use tight stitches along all edges.
For baskets with handles, create slits in your liner where handles are located or measure around them when cutting your fabric pieces.
If you used removable liners, simply take them out and wash them according to their fabric care instructions. If glued in place, spot clean as needed.
Absolutely! If you want a different look or if your current liner gets worn out, simply remove it and replace it with new fabric following these same steps.
[1] https://thanhcongcraft.com/how-to-make-a-wicker-picnic-basket/
[2] http://www.cominhome.net/2011/06/how-to-cover-baskets-with-fabricsew-or.html
[3] https://www.curbly.com/3569-how-to-write-a-great-diy-how-to
[4] https://www.nordiccrafter.com/post/a-quick-fabric-basket-tutorial
[5] https://www.youtube.com/watch?v=bAW1m-ebjnM
[6] https://sugarandcloth.com/behind-the-scenes-of-a-diy-blog-how-to-write-a-blog-post-videos/
[7] https://www.newtoncustominteriors.com/how-to-make-a-basket-liner/
[8] https://www.confessionsofaserialdiyer.com/thrift-store-baskets-go-coastal/
[9] https://verpex.com/blog/website-tips/how-to-start-a-diy-blog
[10] https://www.youtube.com/watch?v=fhf8vTe6bRE