Views: 222 Author: Tomorrow Publish Time: 2024-12-27 Origin: Site


Content Menu
>> Step 1: Preparing Your Materials
>> Step 3: Building Up the Sides
● Creative Uses for Your Yarn Basket
● FAQ
>> 1. What type of yarn is best for making baskets?
>> 2. How long does it take to make a yarn basket?
>> 3. Can I use other materials besides yarn?
>> 4. How do I clean my yarn basket?
>> 5. Can I make larger baskets using this method?
Creating a handmade basket with yarn is a delightful and rewarding craft that allows you to express your creativity while producing something functional. This guide will walk you through the process step-by-step, ensuring you have all the necessary materials and techniques to create a beautiful yarn basket.
To get started, gather the following materials:
- Yarn: Choose any color or type you prefer. Cotton yarn is often recommended for its durability, but feel free to experiment with different textures and colors. You can also use acrylic yarn for a more budget-friendly option.
- Rope or Cord: A sturdy cotton clothesline or jute rope works well as a base for your basket. The thickness of the rope will affect the overall sturdiness of your basket. Consider using a natural fiber for a rustic look or synthetic options for vibrant colors.
- Scissors: For cutting yarn and rope.
- Canvas Needle: A large needle is essential for threading the yarn through the rope. A tapestry needle can also work well for this purpose.
- Mold (optional): You can use a bowl or container to help shape your basket. This can be particularly useful for beginners to maintain a consistent shape.
Start by cutting your rope to the desired length. For a small basket, about 4 yards of rope should suffice. Cut approximately 3.5 yards of yarn to begin with.
1. Wrap the Rope: Lay your rope flat and hold one end together with the yarn. Begin wrapping the yarn around both the rope and itself, creating a tight coil. Aim for about an inch of wrapped yarn at the tip.
2. Secure the Base: Once you've wrapped enough yarn, fold the wrapped part in half and continue wrapping more yarn around it to form a teardrop shape.
3. Anchor Stitches: Use your needle to push down through the center of the coil to secure it, creating what is known as an anchor stitch. Repeat this process every few wraps to maintain stability.
4. Forming the Base Size: Keep wrapping until you reach your desired base size. The number of wraps will depend on how large you want your basket to be.
1. Start Coiling Upwards: Once you are satisfied with the base size, begin coiling the wrapped rope upwards instead of laying it flat.
2. Continue Wrapping: As you wrap, make sure to secure each layer with anchor stitches against the previous layer.
3. Height Adjustment: Continue this process until your basket reaches your desired height.
1. Final Anchor Stitches: When you reach the top of your basket, make several anchor stitches without additional wraps until you've covered all exposed rope ends.
2. Cut Excess Yarn: Trim any excess yarn and tuck in loose ends by weaving them into previous stitches for a clean finish.
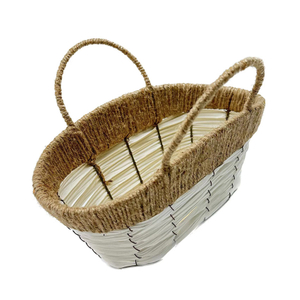
3. Optional Handles: If desired, create handles by attaching additional lengths of rope or yarn on either side of your basket.

- Tension Control: Maintain consistent tension while wrapping; too loose will yield a floppy basket, while too tight may distort its shape.
- Color Coordination: Feel free to mix and match colors as you go along; this can create beautiful patterns and designs within your basket.
- Experimentation: Don't hesitate to try different types of yarn or even incorporate fabric strips for unique textures.
Once you're comfortable with basic basket weaving, consider these advanced techniques:
- Adding Beads or Embellishments: Incorporate beads into your design by threading them onto your yarn before starting or weaving them in as you go. This can add an elegant touch to your basket and make it truly unique.
- Changing Colors Midway: To switch colors seamlessly, simply lay down the new color next to the old one and continue wrapping as before. This technique allows you to create stripes or patterns without any visible knots.
- Different Shapes and Sizes: Experiment with different molds (like bowls or boxes) to create baskets of various shapes and sizes. You can also adjust how tightly you wrap each layer to create wider or narrower baskets as needed.
While making your yarn basket, be mindful of these common pitfalls:
- Inconsistent Tension: If you vary how tightly you wrap your yarn, it can lead to uneven sides or gaps in your basket structure.
- Skipping Anchor Stitches: Failing to secure each layer with anchor stitches can cause your basket to unravel over time, especially if it's used frequently.
- Not Planning Size Ahead: Before starting, have a clear idea of how large you want your basket to be; this will help guide how much rope and yarn you need initially.
Once you've completed your handmade basket, consider these creative uses:
- Storage Solution: Use it as a decorative storage solution for items like toys, magazines, or craft supplies around your home.
- Gift Basket: Fill it with goodies such as snacks, candles, or bath products for a thoughtful gift that showcases both your crafting skills and personal touch.
- Home Décor: Place it on shelves or tables as part of your home décor; it can serve as an eye-catching centerpiece filled with seasonal decorations or flowers.
Making a handmade basket with yarn is not only a fun project but also allows for personal creativity and expression. You can customize your basket's size, color, and design according to your preferences, making it a perfect addition to any home decor or a thoughtful gift for friends and family. The skills learned from this project can also be applied to other crafts such as crocheting or knitting baskets, expanding your crafting repertoire further.

Cotton yarn is often recommended due to its durability and ease of handling, but you can use any type that suits your style.
The time required varies based on size and complexity but typically ranges from 2 to 4 hours.
Yes! You can use fabric strips, jute twine, or even macrame cords for different textures and styles.
To clean your yarn basket, gently spot clean with mild soap and water; avoid soaking it as this can distort its shape.
Absolutely! Simply increase the length of rope and yarn used, adjusting your technique accordingly for larger sizes.
[1] https://makesomethingmondays.com/craft-ideas/diy-yarn-basket/
[2] https://flaxandtwine.com/blogs/blog/hand-woven-basket-tutorial
[3] https://www.instructables.com/Weaving-a-Yarn-Basket/
[4] https://www.youtube.com/watch?v=6_Mv2_etf9c
[5] https://www.sisterswhat.com/2018/05/diy-yarn-wrapped-rope-basket-sewing.html
[6] https://www.marymaxim.com/blogs/tutorials/how-to-weave-a-basket-with-yarn-a-step-by-step-guide
[7] https://www.youtube.com/watch?v=bSK1PbeTQYs
[8] https://www.youtube.com/watch?v=CnZyorNL320
[9] https://www.youtube.com/watch?v=XJAE5njZDgc
[10] https://happyhourprojects.com/woven-yarn-basket/