Views: 222 Author: Tomorrow Publish Time: 2025-01-22 Origin: Site


Content Menu
>> Step 2: Create Weaving Strips
>> Step 3: Assemble Your Basket
● Additional Techniques for Enhancing Your Basket
● Tips for Crafting Your Basket
● Exploring Weaving Techniques
● Benefits of Crafting Baskets
● FAQ
>> 1. What type of cardboard is best for making a yarn basket?
>> 2. Can I use fabric instead of yarn?
>> 3. How do I make my basket more durable?
>> 4. Can I customize my basket's size?
>> 5. What other projects can I do with leftover cardboard?
Creating a yarn basket from a small cardboard box is a fun and creative project that combines recycling with crafting. This guide will take you through the entire process, from cutting the box to weaving the yarn, ensuring you have all the information you need to create a beautiful and functional basket.
- Cardboard Box: A small box (e.g., a cereal box or a shoe box)
- Craft Knife or Scissors: For cutting the cardboard
- Cutting Mat: To protect your workspace
- Yarn: Choose your favorite colors and textures
- Tape: For securing the box
- Ruler: For measuring and marking
- Pencil: For marking cutting lines
- Hot Glue Gun (optional): For additional reinforcement
1. Flatten the Box: Start by flattening your cardboard box. This will make it easier to cut and mark.
2. Measure and Mark: Use a ruler to measure out the dimensions you want for your basket. For example, if you want a basket that is approximately 7” x 9” x 12”, mark these dimensions on the flattened box.
3. Cut the Box: Using a craft knife or scissors, carefully cut along your marked lines to create the base of your basket. Make sure to cut off any flaps at the top of the box.
1. Mark Strips: On one side of the flattened box, mark lines every 1 inch (2.5 cm) across the width of the cardboard. These will be your weaving strips.
2. Cut Strips: Cut along these marked lines, stopping just before you reach the bottom of the box (where it will fold). This will create tabs that can be woven together later.
3. Remove Every Other Strip: To create a weaving pattern, remove every other strip from the bottom of your marked lines, leaving alternating strips intact.
1. Fold Up Sides: Fold up the sides of your basket using the strips as vertical supports. Secure them with tape at the corners to hold them in place.
2. Reinforce Bottom (Optional): If desired, use hot glue to reinforce the bottom of your basket for added stability.
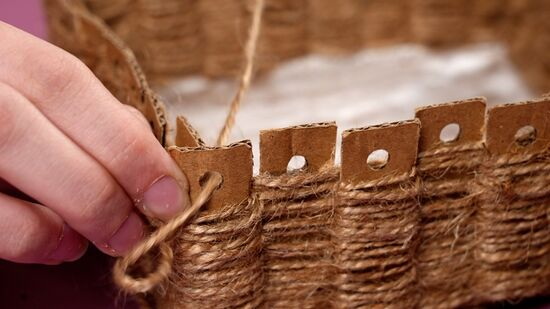
1. Prepare Your Yarn: Cut a length of yarn about 20 yards long for weaving.
2. Weave Yarn Through Strips:
- Begin at one end of the basket, wrapping yarn around each vertical strip.
- Use an over-and-under pattern as you weave through each strip, alternating between going over one strip and under another.
- Continue this pattern until you reach the top of the strips.
3. Secure Ends: Once you reach the top, secure your yarn ends by tucking them into previous rows or using a hot glue gun for extra security.

To further enhance your yarn basket, consider incorporating additional techniques:
- Use Variegated Yarn: Opt for variegated yarns that change color throughout their length for a visually dynamic effect.
- Mix Textures: Combine different types of yarn (e.g., cotton, wool, or acrylic) to add texture and visual interest to your basket.
1. Cut Two Strips of Cardboard: Measure and cut two long strips from another piece of cardboard to serve as handles.
2. Attach Handles: Use hot glue or tape to attach these handles securely to opposite sides of your basket for easy carrying.
- Use Sharp Tools: Always use sharp scissors or craft knives for clean cuts, which will make assembling easier.
- Be Patient with Weaving: Take your time while weaving; rushing can lead to uneven tension or gaps in your design.
- Experiment with Patterns: Don't hesitate to try different weaving patterns or even add embellishments like beads or fabric scraps to personalize your basket further.
To help illustrate these steps further, consider watching tutorial videos available online that demonstrate similar projects:
Weaving is an ancient craft that has evolved over centuries into various forms used across cultures worldwide. Here are some popular techniques that can be adapted into your yarn basket project:
1. Plain Weave:
- The simplest form where strands alternate over and under each other.
- This technique creates a flat surface that is easy to manage.
2. Twill Weave:
- Involves passing one strand over two others before going under one.
- This creates diagonal lines across your work which can add depth.
3. Basket Weave:
- A variation where two strands are woven together over two others.
- This technique creates a checkerboard pattern which adds texture.
4. Lattice Weave:
- Combines vertical and horizontal strands creating an intricate design.
- Perfect for decorative baskets but requires more skill.
When selecting yarn for your project, consider:
- Cotton Yarn:
- Strong and durable; ideal for baskets that need structure.
- Acrylic Yarn:
- Available in various colors; lightweight but may lack sturdiness.
- Wool Yarn:
- Offers warmth and elasticity; great for cozy baskets but may be pricier.
- Jute Twine or Rope:
- Perfect for rustic-style baskets; adds natural texture but can be rough on hands during weaving.
Engaging in crafting activities like making baskets offers numerous benefits:
- Mental Health Improvement:
- Crafting provides therapeutic benefits by reducing stress levels and promoting mindfulness.
- Sustainability Practices:
- Using recycled materials contributes positively towards environmental conservation by reducing waste.
- Skill Development:
- Enhances fine motor skills and hand-eye coordination while allowing creativity to flourish.
Crafting a yarn basket from a small box not only results in functional decor but also serves as an enjoyable pastime that fosters creativity while being eco-friendly. By experimenting with different techniques, materials, and designs, you can personalize each creation according to taste and style preferences—making every piece unique!
Creating a yarn basket from a small cardboard box is not only an enjoyable craft but also an excellent way to repurpose materials that might otherwise be discarded. By following these steps and incorporating additional techniques, you can create unique baskets that can be used for storage or decoration in your home.
The process is not only fulfilling but also allows you to express creativity while being eco-friendly. So gather your materials, unleash your creativity, and enjoy crafting!

The best type of cardboard is thick and sturdy, such as from cereal boxes or shipping boxes. Avoid thin cardboard as it may not hold up well when woven with yarn.
Yes! You can use fabric strips or other materials like twine or ribbon for weaving if you prefer different textures or colors.
To enhance durability, consider reinforcing corners with tape or glue and using thicker yarns or materials for weaving.
Absolutely! You can adjust measurements when cutting your cardboard base and strips to create larger or smaller baskets according to your needs.
Leftover cardboard can be used for various crafts such as making organizers, picture frames, or even toys for kids!
[1] https://poppytalk.com/2018/10/weaving-diy-chunky-woven-storage-box.html
[2] https://www.instructables.com/DIY-Baskets2-Ways-From-Shipping-Boxes/
[3] https://www.instructables.com/Weaving-a-Yarn-Basket/
[4] https://www.triedandtrueblog.com/super-easy-cardboard-basket-weaving/
[5] https://livingwellmom.com/make-your-own-basket/
[6] https://makesomethingmondays.com/craft-ideas/diy-yarn-basket/
[7] https://www.craftpassion.com/easy-basket-weaving/
[8] https://www.youtube.com/watch?v=oR0O_8vzCDo
[9] http://www.we-are-scout.com/2013/02/tutorial-beginners-crochet-make-a-fabric-basket.html
[10] https://www.youtube.com/watch?v=Atd1lQYhFcA
[11] https://www.instructables.com/How-To-Make-A-Paper-Basket/
[12] https://www.youtube.com/watch?v=z9ItQ67A5Yo
[13] https://happyhourprojects.com/woven-yarn-basket/
[14] https://www.youtube.com/watch?v=og4UopY4rQw
[15] https://www.youtube.com/watch?v=l2DmSPMQBIU
[16] https://www.deliacreates.com/crochet-basics-how-to-make-a-basket/
[17] https://www.cedardellforestfarm.com/blog/2020/7/10/diy-cardboard-weaving-loom
[18] https://www.youtube.com/watch?v=CnZyorNL320
[19] https://butfirstwecraft.com/2021/01/14/mini-basket-weaving/
[20] https://www.facebook.com/Craftsy/videos/making-a-woven-yarn-basket-with-anne-weil-my-weekend-project/3426986107341667/
[21] https://www.youtube.com/watch?v=yhzLcpgKY9s
[22] https://craftingforweeks.com/modern-crochet-baskets/