Views: 222 Author: Tomorrow Publish Time: 2025-02-09 Origin: Site


Content Menu
● Understanding Basket Borders
● Preparing Your Basket for Bordering
● Common Border Weaving Techniques
>> 1. Simple Three-Rod Wale Border
● Advanced Bordering Techniques
>> 2. Woven Double Braided Border
● Tips for Perfect Basket Borders
● Troubleshooting Common Border Issues
● FAQ
>> 1. What materials are best for weaving basket borders?
>> 2. How do I fix a mistake in my basket border?
>> 3. Can I add decorative elements to my basket border?
>> 4. How do I maintain the shape of my basket border while it's drying?
>> 5. What are some advanced border techniques I can try?
Basket weaving is an ancient craft that has been practiced for thousands of years, and one of the most crucial aspects of creating a beautiful and durable basket is mastering the art of weaving a border. The border not only adds a finishing touch to your basket but also reinforces its structure and enhances its overall appearance. In this comprehensive guide, we'll explore various techniques and tips for weaving basket borders, providing you with the knowledge and skills to create stunning baskets of your own.
Before diving into the specific techniques, it's essential to understand the purpose and components of a basket border. A well-crafted border serves several functions:
1. Structural support: It reinforces the rim of the basket, adding strength and durability.
2. Aesthetic appeal: A neatly woven border enhances the overall appearance of the basket.
3. Functional finish: It secures loose ends and prevents the basket from unraveling.
A typical basket border consists of three main parts:
1. Pricking down: The process of bending the upright stakes (or spokes) down to prepare for bordering.
2. Weaving: The actual process of interweaving the stakes to create the border pattern.
3. Tucking: Securing the loose ends by weaving them back into the border.
Before you begin weaving the border, you need to prepare your basket properly. Here are the steps to follow:
1. Finish weaving the sides of your basket to the desired height.
2. Trim any excess material from the upright stakes, leaving them long enough to work with (usually about 6-8 inches above the last row of weaving).
3. Soak the stakes in water for about 30 minutes to make them pliable and easier to work with.
This is a basic border technique that's perfect for beginners. Here's how to do it:
1. Bend down all the stakes at a 90-degree angle.
2. Take the first stake and weave it behind the next two stakes and out to the front.
3. Repeat this process with each subsequent stake, always going behind two and out to the front.
4. When you reach the last few stakes, you'll need to weave them under the beginning of the border to complete the circle.
This classic border technique creates a more intricate pattern:
1. Bend down all the stakes at a 90-degree angle.
2. Take the first stake and weave it behind the next four stakes and out to the front.
3. Take the next stake and weave it behind the next four stakes (including the one you just wove) and out to the front.
4. Continue this pattern around the basket, always going behind four and out to the front.
5. For the last few stakes, weave them under the beginning of the border to complete the circle.
For a more decorative finish, try a braided border:
1. Separate the stakes into groups of three.
2. Begin braiding each group, crossing the right stake over the middle, then the left over the new middle.
3. Continue braiding until you reach the desired length (usually about 2-3 inches).
4. Tuck the ends of each braid back into the weaving of the basket to secure them.
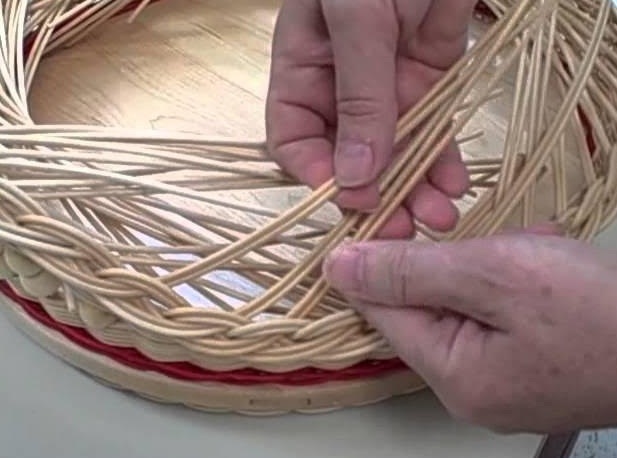
As you become more comfortable with basic bordering techniques, you can explore more advanced methods to create unique and intricate designs.
This technique creates a fuller, more elaborate border:
1. Follow the steps for a simple braided border.
2. Once you've completed the first round of braids, start a second round using the remaining length of the stakes.
3. Weave this second round of braids in between the first round, creating a layered effect.
This technique combines braiding with additional weaving for a complex, textured border:
1. Create a simple braided border.
2. Use additional weaving material to weave in and out of the braids, creating a woven pattern on top of the braids.
To ensure your basket borders look professional and well-crafted, keep these tips in mind:
1. Maintain consistent tension: Keep the tension even as you weave to ensure a uniform appearance.
2. Work slowly and carefully: Take your time, especially when learning new techniques.
3. Use a spray bottle: Keep your materials damp as you work to maintain flexibility.
4. Practice on scrap materials: Before attempting a new technique on your basket, practice on spare stakes or a practice piece.
5. Pay attention to spacing: Keep the spaces between your weaves consistent for a neat appearance.
Even experienced basket weavers encounter challenges. Here are some common issues and how to address them:
1. Uneven tension: If your border looks uneven, try adjusting the tension as you go. You may need to undo a section and re-weave it with more consistent tension.
2. Loose ends: If you have difficulty tucking in the ends securely, try using a weaving tool or needle to help guide them into place.
3. Splitting stakes: If your stakes are splitting as you bend them, they may be too dry. Try soaking them for a longer period or using a spray bottle to keep them moist.
4. Gaps in the border: If you notice gaps, you may need to adjust your weaving technique or use thicker material for your border.
Once you've completed your border, there are a few final steps to ensure your basket looks its best:
1. Trim any remaining loose ends carefully with sharp scissors.
2. Use a damp cloth to smooth down any frayed fibers.
3. Allow your basket to dry completely before using or displaying it.
Mastering the art of weaving basket borders takes practice and patience, but the results are well worth the effort. By learning various bordering techniques, you can add a professional finish to your baskets and create unique, beautiful designs. Remember to start with basic techniques and gradually work your way up to more complex patterns as your skills improve. With time and practice, you'll be creating stunning basket borders that will elevate your craftsmanship to new heights.
![Round Wicker Basket]](http://ijrorwxhloqjlj5p.ldycdn.com/cloud/liBpkKlolkSRmkrmjplnjp/Round-Wicker-Basket.jpg "Round Wicker Basket]")
The best materials for basket borders are typically the same as those used for the main body of the basket. Common choices include:
- Reed: A versatile and widely used material, available in various sizes.
- Willow: Offers flexibility and a natural, rustic appearance.
- Seagrass: Provides a unique texture and is often used for decorative borders.
- Cane: Sturdy and durable, ideal for larger baskets.
Choose materials that complement your basket's overall design and purpose.
If you notice a mistake in your basket border, follow these steps:
1. Carefully undo the weaving back to the point of the mistake.
2. Correct the error by re-weaving the section properly.
3. Continue weaving from that point, ensuring consistent tension.
4. If the mistake is minor, you may be able to adjust it without undoing the entire section.
Remember, it's better to fix mistakes as soon as you notice them rather than trying to hide them later.
Yes, you can enhance your basket border with decorative elements such as:
- Beads: Thread small beads onto the weaving material before creating the border.
- Colored materials: Incorporate dyed reed or other colored materials for contrast.
- Wrapped sections: Use thin material to wrap certain sections of the border for added texture.
- Natural elements: Incorporate small shells, seeds, or other natural items into the border design.
Experiment with different decorative elements to create unique and personalized basket borders.
To maintain the shape of your basket border while it dries:
1. Use clothespins or small clamps to hold the border in place.
2. Place the basket upside down on a flat surface to prevent warping.
3. If necessary, stuff the basket with crumpled paper to maintain its shape.
4. Allow the basket to dry slowly in a well-ventilated area, away from direct heat or sunlight.
Proper drying ensures your border retains its shape and structure.
Once you've mastered basic borders, consider trying these advanced techniques:
- Twill borders: Create intricate patterns by weaving over and under multiple stakes.
- Lashed borders: Use additional material to lash or bind the border for a unique look.
- Sculptural borders: Experiment with three-dimensional border designs that extend beyond the rim.
- Mixed material borders: Combine different materials or weaving techniques within a single border.
These advanced techniques can add a distinctive touch to your basket creations and showcase your skills as a weaver.
[1] https://www.youtube.com/watch?v=omhB6ZAXb7A
[2] https://www.matttommey.com/blog/the-5-best-basket-weaving-techniques-using-natural-materials
[3] https://www.gathered.how/arts-crafts/weaving/beginners-guide-to-basket-weaving
[4] https://basketweavee.com/how-to-weave-a-basket-border/
[5] https://www.youtube.com/watch?v=owkA_lVMzRM
[6] https://www.matttommey.com/basket-weaving-techniques
[7] https://www.textileindie.com/beginners-guide-basket-weaving/
[8] https://www.youtube.com/watch?v=cqpNqDWy4hw
[9] https://www.countryseat.com/faq-weaving-terms.html
[10] https://myown2hands.co/blogs/the-my-own-2-hands-blog/basket-weaving-at-home-a-step-by-step-guide